|
Hint
|
Answer
|
|
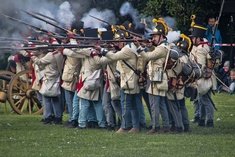
The most common formation in the Napoleonic Wars. A unit is normally laid out in 2-3 ranks in order to maximize the firepower of the unit. Normally, the first rank is either crouched or standing up, while the second and third rows shoot over the shoulders of the soldiers in front of them. This formation is extremely vulnerable to cavalry, however quite effective against artillery as round shot can only rip through a few men.
|
Line Formation
|
|
The most common campaign formation in the Napoleonic Wars. A unit is normally laid out in 3-5 columns in order to maximize the mobility of the unit. In this formation, a unit is extremely mobile and able to traverse roads effectively. Ontop of this, the momentum of the unit can be used to break defensive positions, forming a giant spearhead attack. This formation was utilized by fast moving armies, such as Napoleon Bonaparte's Armee d'Italie and Blucher's Prussian suicide attacks.
|
Column Formation
|
|
This was the most common formation for untrained or massed attacks during the Napoleonic Wars. A unit is normally laid out into 15-20 columns or lines, which can resemble a filled square or rectangle. This unit, although with limited firepower, has the ability to quickly form up into square to repel cavalry. This formation aswell was very powerful when massed, and can easily be used as a effective assault column. Notable uses of this formation are 1809, Aspern-Essling and 1812, Borodino, the assaults on the Great Redoubts and The Fleches.
|
Battalion Mass
|
|
This was the most effective formation for defeating cavalry charges, especially on mass. The unit would normally form up into a 2-3 rank deep hollow square, which normally resembled a rectangle. The first rank would stay in a "brace" formation, with units crouching and holding their bayonets out at a 45 degree angle. The second and third ranks were normally firing to repel cavalry. Since cavalry normally are afraid to charge into a wall of men, they will rear back, which leads the rider extremely exposed.
|
Square Formation
|
|
|
Hint
|
Answer
|
|
This was the most commonly used formation for light infantry units who wished to skirmish against an enemy. The unit will normally take 3 paces distance from one another in order to maximize the screen of the unit, whilst advancing in a low skirmishing order. They will utilize cover, and harass the enemy from a far. The consequences of this unit is that it is extremely vulnerable to cavalry, especially lancers and hussars, who can easily saber hundreds of exposed troops. However, this troop is effective against round shot and howitzer.
|
Skirmish Formation
|
|
This was a unit mostly used by battalion commanders in order to push a troop off of a defensive position. The unit would form based on companies, with 2 columns of 3 companies laid out. Normally, the Grenadier and 1st Fusilier companies would be in the front, or depending how green the unit was, the Voltiguier company. The less experienced units would be in the rear. The objective of this attack was to intimidate the enemy with a huge blob of men, in one forced assault with multiple units. However, against well trained and disciplined infantry, with rapid fire and extreme vulnerability to projectiles and artillery, they can be repelled. A notable example of this formation was Napoleon's Old Guard division during the Battle of Waterloo, which advanced up the Reverse slope of Mont St-Jean in this formation.
|
Column of Divisions
|
|
This formation was similar to the previous one listed above. In this formation, the battalion would form into linear formation. However, multiple units (mostly 2 battalions, however 1 was also common) would be formed up into a thick column behind the left and right units respectively. The unit would move forward, whilst keeping their superior firepower, but having the strength of a large push. The objective of this formation was to destroy the enemy with a large, sweeping volley, then to charge with the reserves and push an enemy off of a defensive position. A notable use of this formation would be the Spanish defense at Albuera, or MacDonald's formation during the Battle of Wagram, which would finish the Austrians and force a retreat.
|
Attack Column
|
|
This formation was widely used by grenadiers du'choc during assaults of very complicated terrain. Instead of adopting the formal shoulder to shoulder assault, grenadiers would choose to spread out, maybe around 1-2 feet apart from each soldier, and maintain a constant march towards the enemy. In this formation, the grenadiers were vunrable to artillery, but were able to screen a much larger area. This formation was utilized in forests, especially by line battalions when it was complicated to peruse an enemy or to advance.
|
Disperse
|
|